Homemaking is whatever you make of it. Every day brings satisfaction along with some work which may be frustrating, routine, and unchallenging. But it is the same in the law office, the dispensary, the laboratory, or the store. There is, however, no more important job than homemaking. As C.S. Lewis said, "A housewife's work... is the one for which all others exist."

James E. Faust


Friday, December 9, 2011

Christmas Crafting 2011

I love to create things, especially at Christmas time. This year is no different. Check out the things I've been working on!
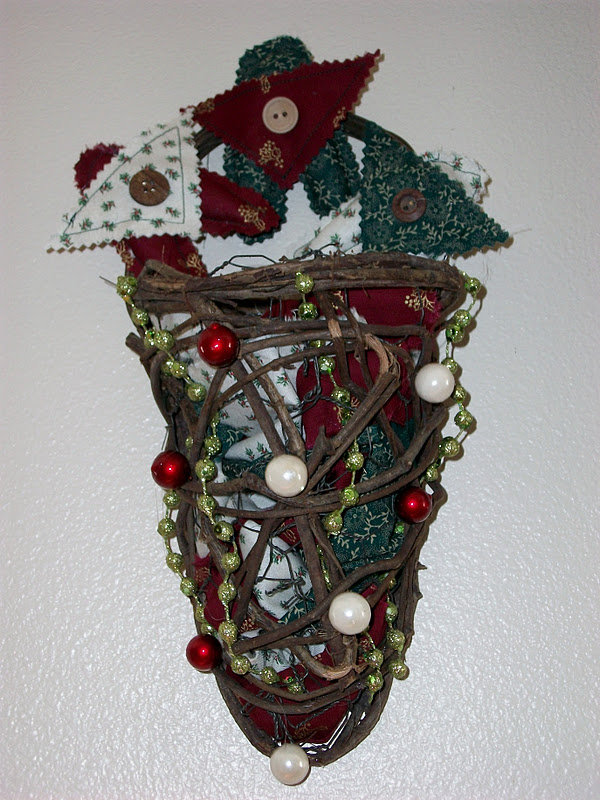
The first crafts I made were these cute little sconces. I decided I needed something to balance out my rag wreath but I had no idea what I wanted to put there. The only thing I knew I wanted was the cute stars you see on the top of the sconces. I once saw these stars on a Christmas tree at my doctor's office and fell in love. They're super easy to make too.

While I was at Hobby Lobby I came upon the sconces and thought they were cute and unique. I am a sucker for anything made out of grapevines. I then glued the berries on and stuffed the insides of them with leftover squares from the rag wreath. I think they turned out really cute and they go well with the wreath. :)
The next project I worked on was my little Christmas tree that sits on top of my fireplace mantle. I've always decorated this tree the same way every year but last year I decided to try something new. So after Christmas I bought some new ornaments on clearance. The garland is made from white feather boas and the tree skirt is made from fabric I got out of the remnant bin.

The tree skirt was horrible to make and don't look very closely at the stitching because it's not very good. I learned the hard way that my sewing machine doesn't like sewing sequined ribbon but I got it done and I like how it looks with the tree.
And it wouldn't be a good crafting session without some painting. I found this snowman at Hobby Lobby for $2.95! A little paint later and voila! Most of my Christmas decorations are snowmen and I think this guy makes a welcome addition to my ever-growing collection.

Merry Christmas Crafting!

Friday, November 18, 2011

Kitchen Drawer Dilemma... Solved!

The holiday season is upon us and you know what that means right? Lots of time spent in the kitchen creating yummy goodies for all to share! Why not seize the opportunity then to get a little more organization in your kitchen to help the Holidays be a tiny bit less hectic! Every little bit helps, right?
This used to be what my utensil drawer looked like. Not pretty, huh? It was a huge pain to find anything in there and sometimes it would take my husband and I a couple of tries of digging through it before we found what we were looking for. So frustrating, especially when dinner was already on the table! One day I decided enough was enough and began brainstorming to find a better way to organize my cooking utensils. Here's what I came up with:
I went to the store and purchased some very inexpensive drawer organizers. They can be found in the kitchen department of any Wal-Mart or Target. Seriously, they're like $1.50 each for the white ones. I think the black one was more like $7.00 and normally I wouldn't have bought it but two more white ones wouldn't fit. :( I measured my drawers first so I knew that! I then categorized the utensils as best as I could and placed only the utensils I use the most in there.
The every-so-ofteners found a new home in a separate cupboard in my kitchen that had some extra space. The rolling pin was a bit too awkward even for this space so eventually I moved it from this cupboard to my kitchen towel drawer which is the only other place I knew I would remember where it was. My mom always kept her rolling pin in her towel drawer too. Why was that Mom? Probably because it didn't fit anywhere else!
Finally, the serving spoons and spatulas went in a caddy right next to the stove for easy access. I love this caddy. It's very homey don't you think? Plus, it uses hardly any precious counter space.
These drawer organizers work for any drawer. See how I used them in this drawer? To the right I have all the baby utensils and medicince droppers. Up at the top I have my measuring spoons. I love that they're in their own space because when I'm cooking or baking I just pull out the whole basket and have all the measuring spoons right at my finger tips.

So there you go, a super easy (and cheap!) way to organize your kitchen drawers. No more excuses, get to work! ;)

Monday, October 24, 2011

No Cans Allowed

I have a bucket list per say of things I would like to learn how to do that I think would make me be a more rounded housewife. They're just silly things like learn how to make candy or eventually have such a bounty of fruit and veggies growing in my yard that I have to can them. I think we all have secret wishes of being a little more fabulous in the kitchen and our homes. I know I do.

One of the items on my list was to learn how to make a pumpkin pie from a pumpkin. I tried it for the first time last year and, lo and behold, it actually worked and tasted good! If you've always wondered what goes into making a pumpkin pie sans the can then read on and I'll take you on a fantastic journey. Okay, okay, maybe not fantastic but interesting nonetheless!

First you need one of these bad boys, aka a sugar pumpkin. Sugar pumpkins are small (about the size of a grapefruit) and you may have doubts that one of them could make a pie (I did) but rest assured there is enough fleshy goodness to indeed fill a pie shell. Last year when I made my pie I set a goal for the next year to first grow the pumpkin before I turned it into a pie. Did I meet my goal?


Eh, sort of. I grew pumpkins but not sugar pumpkins. I opted for jack-o-lantern pumpkins this year for the kids. I'm still counting it! So after you've obtained your pumpkin (which can be found at any grocery store this time of year), the next thing you have to do is cut it in half, cut the stem off and get to work scooping out the seeds. Honestly, this is the hardest part of the whole thing. Sugar pumpkins seem to be very attached to their guts but it is very important to make sure all the strings are out otherwise you'll be sifting them out later when you mix everything together which is not cool. Last year I did it alone. This year I enlisted my husband and his strong man hands to finish the deed. Ah, much better.

After all the guts are out, cover each half in aluminum foil, place on a cookie sheet and pop them in the oven at 350 for one hour. The pumpkin should be tender when pierced with a fork and that's how you'll know it's done.
After it's all cooled, use a spoon to scoop out the pumpkin from the shell. This part is easy. The pumpkin literally just falls out of the shell with minimal pressure. Piece of cake (or should I say pie?)! One you've got your pumpkin scooped out, mix it and the other ingredients together (make sure you have a big bowl because once all the ingredients are in there it's very soupy and tends to splatter when being mixed) and pour into the pie shell. Yes, I said pie shell. I don't make my own pie crusts. I know how but they never turn out pretty and make me angry so I opt to let my good friends at Pillsbury make one for me.
After your pie has baked for the allotted time it should look something like this. Isn't it purdy?! You won't believe the difference between a pie from a pumpkin and a pie from a can.

The best part of this whole pie experience is that I really felt like I learned something. So many of the things that our grandmothers did have gotten lost in the hustle and bustle of modern living. It was so refreshing to take my time and make something with my own hands. There's a lot of love that goes into this kind of baking and I know that's why my grandmothers' cooking always tasted so good too.

What's on your "inner pioneer" bucket list? 

*Oh and the reason I didn't post the recipe is that it (and the all the instructions for making a pie) can be found on the bottom of the pumpkin when you buy it. If for some reason you need it, just shoot me a comment and I'll post it for you. :)


Friday, September 23, 2011

"Fall"ing in Love

I've not had time to devote to this blog lately and I apologize. To my loyal followers, thank you for hanging in there with me as I've tried to get the hang of having three kids in schools this year and a napping baby too. :)

Happy Fall! Today is the first official day but in my book, fall begins on the very first day of September. We have gorgeous falls around here and I love the sunny days with a soft cool breeze blowing lazily around. I love the crisp mornings and the way the azure sky suddenly gets a little deeper. I love how everything smells cinnamony and homey. I love watching the leaves change, antiquated by the long hot summer, yet refusing to give in to winter without going out in a blaze of fiery autumn hues.

Ah! Autumn is my favorite time of year! And because it is my favorite, I like to do it up right in my home decorating. Each year I try to make or buy something new to adorn my abode with. Here's the things I've added this year:
First I set about making my front porch look festively fall-ish by wrapping autumn leaf garland around the banisters and adding white twinkle lights. This is going to look even cuter come October when I add my friendly ghost and candy corn lights I bought to go around the door! Fun!
I found this large metal pumpkin at Hobby Lobby and fell in love. I put it up where I had the seashell wreath I made for summer. It seemed lonely so I bought two wreaths from the dollar store to go on either side of it. The were super easy to make: I simply spray painted them brown spray paint and tied strips of fabric around them. I added felt sunflowers to the top for some more visual interest. Total, they cost me a whopping 3 dollars!
The Happy Harvest sign was my fall purchase from last year and it's great. The real thing I'm excited about in this picture though is the paper pumpkins on the mantle behind it. I bought them on clearance the year we moved to Utah and they have been in their bag since. I just couldn't figure out what to do with them. I think they look cute interspersed with the autumn leaves, don't you? Next year I hope to find something to put up in place of the "Home Rules" sign at the back that will match a little better. The best part about this display is it keeps us all from stacking clutter on the mantle like we usually do! :)

Being a wife and a homemaker can sometimes be dull, monotonous, and hard. It's easy to lose sight of the little things that bring us joy in each day. Decorating for fall is so fun for me! It makes me happy when I look around and take it all in. Add to that a spicy smelling candle and there is nothing better.

It's just what I need to bring a smile to my face when I've had a stressful day. What brings you joy about fall?

Friday, August 26, 2011

Keeping Mornings Stress-Free

Now that it's back to school time for kids again it's time to think about ways to keep the mornings running smoothly. Here's a couple of tips to get you started!
Every Sunday night I make my way up to my three older kids' bedrooms and set out the clothes they will wear during the school week. My kids are all still young enough that they don't really have an opinion of what they wear and this way I make sure all of their clothes are being worn equally. If you have some opinionated kids then I suggest you have them in the room with you helping so they can make sure they're wearing what they want.

You could buy a fancy-schmancy clothing organizer doo-dad but I have found that the tops of my kids' dressers work just fine. I made some labels on the computer, laminated them with my trusty mini-laminator, and taped them to the walls using painters tape. Cheap, easy, and practical is what I'm all about.

It's my kids' responsibilty to get dressed when they wake up and because of my system it works great! Everyone always has something to wear and no one is frantically searching for an article of clothing.
I made this check list for my oldest back when she was in kindergarten. Back then I had a toddler and a baby to manage as well and so it was important to have the one who was capable of doing more things to be independent. Now I have a 3rd grader, a kindergartner, a preschooler, and a baby. The older three all have different school schedules so having a check list has become all the more important.

Instead of me hollering at my kids to get ready, they do it themselves. I have one of these lists posted on the fridge and another up in my girls' room so they can refer back to it as needed.  I also have added the times my older two go and come home from school along with the number to the school. That way mom doesn't forget anything either!

Getting your kids ready in the morning doesn't have to be a chore.

All it takes is a little planning ahead!

Friday, August 12, 2011

Super Easy Turkey Meatball Stir-Fry

Okay so apparently, I am in a recipe sort of mood on this blog lately. :) This year I have planted a garden and am so excited to cook with some fresh veggies that I grew all by myself! This recipe is a favorite at my house and is perfect for garden goodies. I thought I'd be nice and share it with you all too!

Here it is:

What You Need:
1/3 pkg of pre-cooked frozen turkey meatballs.
2-3 cups of your favorite fresh veggies (chopped). Last time I made this with pea pods (halved), yellow squash (sliced), carrots (chopped), bell peppers (diced), and baby corn (halved). I always just put in whatever I have on hand.
1/4 cup apricot jam
1/4 cup Catalina dressing
2 tbsp low sodium soy sauce
1/2 tsp. ground ginger
1/2 tsp garlic powder
2-3 cups cooked brown rice

Make It:
 Combine all ingredients in a large skillet.
Cook on medium high heat, 10 minutes, stirring occasionally.

Serve over brown rice.

Tips to Make it Work Great!
* I adapted this recipe from a recipe found on kraftrecipes.com. However, I have found everything cooks a little more evenly if I take the meatballs and zap them in the microwave for a couple of minutes so they're a little thawed before adding them to the skillet.

*While the meatballs are cooking in the skillet I take my trusty wooden spoon and break them into fourths. This is just a personal preference but I like to have a little bit of meat with each bite of veggies instead of one big meatball.

*The original recipe says to cover the skillet while everything's cooking but I like my veggies to be more crisp so I leave the lid off.

*This recipe can also be made using a package of frozen stir-fry vegetables so it can be used in the winter time as well when fresh, good quality veggies are harder to come by.

I hope this recipe becomes a favorite of your family's too!

Friday, August 5, 2011

Root Beer Float Cake


Since it's summer it's a must at my house to have yummy Root Beer Float Cake. I saw the recipe when I was home visiting my mom a couple of years ago on her Gooseberry Patch calendar. I was a bit skeptical but it turned out so yummy! The frosting tasted like the foam on a root beer float. It was very fluffy and held up well. I was worried it would absorb into the cake but it set just fine.

Here's the recipe:
Root Beer Float Cake
18-1/4 pkg white cake mix
2-1/4 c. root beer, chilled and divided
1/4 c. oil
2 eggs
1 env. whipped topping mix (Dream Whip)
In a large bowl, combine cake mix, 1-1/4 cups root beer, oil and eggs; beat until well blended. Pour into a greased 13"x9" baking pan. Bake at 350 for 30-35 min.; cool completely. In a medium bowl, combine remaining root beer and whipped topping mix; beat until soft peak forms. Frost cake.

Friday, July 29, 2011

Beauty Is...

I used to dread art class when I was a kid. It seemed no matter how hard I tried I just couldn't make my hand create the beautiful picture I envisioned in my head. I hated looking around and seeing, what seemed to me, everyone doing their art projects with ease while I struggled and struggled. Even now as an adult I avoid the arts and crafts activities our church has because I don't like drawing attention to my inadequacies as an artist.
It's funny I tend to feel this way because I am not one of those people who can't make anything. In fact, I am very crafty. Most of the wall hangings in my home are things that I've created. The difference is, I guess, that I've made these things my own way, on my own time. There's been no one to look over my shoulder and critique my art or give me a bad grade.

Instead, I grade my own work and judge whether or not it's worthy to adorn my wall. That makes me happy. I love beautifying my home and improving myself in the process.
I painted this picture recently. It's mediocre, in my opinion, but I put it on my wall anyway. Why? Because I kinda like it, actually. I've always wanted to be a painter and although I know I'll never be a Monet, I am trying.

And so, even though my art teacher never gave me an "A", I'm giving one to myself. An "A" for effort and a "+" for taking the time to do something for myself and beautifying my home at the same time.

To me that's what beauty really is.

Thursday, July 21, 2011

She Sells Sea Shells


Being summer and all I've been in sort of a beachy mood so when I came across this seashell wreath in my mom's Woman's Day magazine, I knew I had to make it. I think it turned out great and I love the eclectic feel it has mixed with my other decor. The only thing I wish now is that my wall were painted a different color so the shells would really pop. A project for another day perhaps... :)

Here's the instructions if you'd like to make your own wreath.

To make the one I made you have to modify Woman's Day's version a little.

-Instead of a 16 inch foam wreath I used a 14 inch one. The 16 inch one was just too big

-They call for 5 bags of shells which is way too much in my opinion and way too expensive. If you make the 14 inch wreath you can get away with two bags easily.

-I also added glass jewels in colors that match my decor. I think it makes the wreath a little more funky and a little more colorful.

Making things for my home makes me happy!

Wednesday, July 13, 2011

How to be a Good Housewife

My husband brought home this funny list from work several years ago about how women were supposed to treat their husbands in the 1950's. It was meant to be used as a guide for being the perfect wife and homemaker. Recently I found it and thought it was worth sharing.

How to be a Good Housewife

1. Have dinner ready: Plan ahead, even the night before, to have a delicious meal ready-- on time.This is a way of letting him know you have been thinking about him and are concerned about his needs. Most men are hungry when they come home and the prospects of a warm meal are part of the warm welcome needed.

2. Prepare yourself: Take fifteen minutes to rest so you will be refreshed when he arrives. Touch up your makeup, put a ribbon in your hair so you will be fresh looking. He has just been with a lot of work-weary people. Be a little more gay and a little more interesting. His boring day may need a lift.

3. Clear away the clutter: Make one last trip through the main part of the house just before your husband arrives, gathering up school books, toys, paper etc. Then run a dust cloth over the tables. Your husband will feel he has reached a haven of rest and order. It will give you a lift too.

4. Prepare the children: Take a few minutes to wash the children's hands and faces if they are small, comb their hair and if necessary change their clothes. They are little treasures and he would like to see them playing the part. At the time of his arrival, eliminate all noise of washer, dryer, dishwasher, and vacuum. Try to encourage the children to be quiet.

5. Be happy to see him.

6. Greet him with a warm smile and show sincerity in your desire to please him.

7.  Listen to him. You may have a dozen important things to tell him but the moment of his arrival is not the time. Let him talk first. Remember his topics of conversation are more important than yours.

8. Make him comfortable: Have him lean back in a comfortable chair or suggest he lie down in the bedroom. Have a cool or warm drink ready for him.
 Speak in a low, soothing, and pleasant voice.

9. Make the evening his. Never complain if he comes home late or goes out to dinner or other places of entertainment without you. Instead, try to understand his world of strain and pressure and his very real need to relax.

10. Your goal: Try to make sure your home is a place of peace, order and tranquility where your husband can renew himself in body and spirit.

11. Don't greet him with complaints and problems.

12. Don't complain if he's home late for dinner or even if he stays out all night. Count this as minor compared to what he might have gone through that day.

13. Don't ask him questions about his actions or question his judgment or integrity. Remember he is the master of the house and as such will always exercise his will with fairness and truthfulness. You have no right to question him.

14. A good wife always knows her place.

There is speculation to whether this is a real list taken from Housekeeping Monthly as the article claims it is. Real or not it's pretty funny yet I am here to testify that there is a lot of truth to it too. My grandma is a bonafide 50's housewife and almost every item mentioned on the list I have witnessed in her own household. Even though my grandparents have a very traditional 50's household they are one hundred percent committed to each other and love each other deeply. So even though that way of life seems so backwards to us now maybe there was something that was working... ie putting your spouse's needs before your own. Just not to the extreme as this article suggests though!

Good and bad but definitely times have changed!

Monday, June 13, 2011

Clothing Organization for Kids' Drawers

Have you ever been in a time crunch and are running around trying to get kids dressed, only to hit a road block when your toddler refuses to wear anything you've picked out? We've all been there (or at least know someone who has).
Toddlers like to be able to assert their independence and who can blame them? They are realizing they are their own person and want some say in the things that happen to them, yet we as their mommies get to make most of the decisions for them.

I ran into this a lot when my oldest was about 3. She insisted on picking out her clothes (which usually consisted of the same shirt over and over), and I insisted on her matching and looking presentable if we were going to be out in public. BTW, if you are reading this and have no problem with your kids picking out their clothes all the time, just disregard this whole post! :)

However, if you're a control freak like me, then perhaps you'd like to keep reading to see how I stopped the daily battles about clothing at my house.

First, I took all the bottoms and tops Ainsley had and put them into outfits. Most people have more shirts than pants, so I found more than one possible shirt and put them both with a pair of pants or shorts. Then, I placed each outfit into a gallon sized storage bag and placed them neatly back into the drawers.
This resulted in Ainsley being able to pick out an outfit which made her happy and feel like she had a say in the matter. I was happy too, because I knew she looked presentable!
I have since done the same for second and third children's clothes but have taken it a few steps further. Since my second child, Aftyn, has so many clothes because she never outgrew last year's batch but has a whole new set from Ainsley for this year, I have organized her clothes by capri outfits (one drawer) and shorts outfits (another drawer). That way when the weather is a little cooler I can easliy find what I'm looking for.
Now when the time comes every morning to get everyone dressed, there are happy faces and no one ends up crying, even me. :)

Tuesday, May 31, 2011

Packing for a Trip?

My second daughter Aftyn at 10 months, preparing for an airplane trip.
Make a list!

I know first hand how stressful it can be when trying to pack a family for a trip--especially when you have little ones or a baby. Believe me, I've had many a trip with my little ones to be really good at packing efficiently and I never forget anything! This morning I was talking to my mom on the phone and she was mentioning all the things she had to remember to pack in her suitcase for her upcoming trip (to see me!). She was worrying that she wouldn't remember everything she needed as she had to pack things she doesn't usually bring.

I suggested she try what I do-- make a list! Here's how I go about it:
One Week Before...
  1. Get a piece of paper for each person you'll be packing for and write their names at the top of the paper.
  2. Write down as many things as come to mind that each person will need.
  3. Keep the lists in a handy place where you'll be able to find them.
  4. Over the course of the week, refer back to lists and add to them as you think of more things that need to be packed (doing this ensures that nothing will be forgotten)
One Day Before...
  1. Keeping your lists with you, start packing.
  2. Check off items as you pack them.
Tips for Packing Babies and Toddlers
  1. Place everything you need for a day's outfit into one gallon-size Ziploc bag ie shirt, pants, socks, underwear, hair ties. Do this for each day of your trip. It makes it so much easier to find what you're looking for!
  2. Always pack extra outfits-- chances are you'll need them!
  3. Designate one suitcase just for your baby. With diapers, wipes, extra clothes, etc. my babies always need a whole suitcase to themselves.
  4. Put canisters of formula or rice cereal in a closed Ziploc bag too. You never know what a change in air pressure or elevation is going to do to those things and you don't want them to explode all over the inside of your suitcase! Yeah, it's happened to me before... not a pretty sight.
Trying to get ready for a trip is always stressful but if you follow a list I promise it'll go smoother and hopefully make your trip that much better because you know you have everything you need to make it so!

Wednesday, May 11, 2011

Organization Class Part IV--Placing!

Remember the rhyme? When organizing a space, think EDIT, SORT, and PLACE. Today we're going to talk about the last step, placing all your beloved things back where they belong.

Placing is by far the best step in my opinion. This is where you can use your creativity by incorporating storage into the overall decor and style of your home.
  • It doesn't have to be costly! If you look at the picture above none of those containers cost me more than seven dollars. Drawer organizers (the flat white basket) cost about a dollar each and can be found at any Target, Wal-Mart or drugstore. You just have to be on the lookout for a deal. You can find really pretty baskets or bowls (like the one my 8 year-old uses for her library books) at a Ross or TJMaxx store for a great price. Craft stores such as Michaels or Hobby Lobby often have baskets at 50% off. When my local Wal-Mart gets their canvas bins in (seasonally) I stock up. They are durable, multi-functional, and cost about $3 each!
  • Think pretty. My daughter was always leaving her library books out and I couldn't figure out where she could keep them that they wouldn't get ruined. After taking a trip to Ross with this problem in mind, I came across a beautiful red salad bowl and realized it would fit perfectly on the shelf of my entertainment center. Now Ainsley's books are nestled safely and out of sight and all my guests see is a pretty red bowl on the shelf!
  • Think storage within storage. Our office area is the second place visitors see when they enter my home so it's crucial to keep it organized, functional, and pretty. Clutter and chaos drive me crazy and I noticed that all the wires were out of control. I had purchased a pretty green basket for them but they were always tangled and lost in there anyway. One day I had had enough and so I came up with a better way to keep all those wires contained. I grabbed my gallon sized Ziploc baggies and began sorting the wires into categories. (Ear phones, digital camera wires, video game controllers, etc.) Then I put all the bags back into the basket and labeled them (see picture above).
  • Label Everything! This is especially crucial to pantry's, closets, and kid spaces. If you want to even have a prayer of keeping your spot organized then you have to make sure that everyone understands (husbands included) where things go. I prefer to make my own labels by typing what I want the label to say on my computer, printing it out, and then laminating it with my personal laminator. Labels last a lot longer if they're laminated. I've also been known to write out labels on the back of index cards and then attach them with painters tape, which sticks but won't ruin the surface it's sticking to.
  • Zoning. When placing your items back in their home try to put all like items on the same shelf/corner/space. For example, one shelf in my pantry is dedicated to baking, another to dinner components, another to snack foods, etc. Zoning your items will make it so much easier to find what you're looking for.  I'm all about efficiency which is why I started organizing in the first place.
Happy placing everyone!

Wednesday, April 27, 2011

Organization Class-Part III

If you'll remember last week, we talked about how in order to organize a space you have to clean it out first. Hopefully, it worked out for you! This week we're going to continue on with the next step which is sorting. If you made it through editing then sorting will be a breeze!

  • The trick to sorting is to break your project up into small pieces.
  • Try not to get overwhelmed as you go through what you've decided to keep.
  • Make a pile for each thing you'll be keeping, according to likeness, color, etc.
  • Categorize things in a way that make sense to you. When I organized my pantry, I sorted things this way. In one bin I placed all the breads and also included peanut butter, so everything to make a sandwich is right there. I did the same when I organized my laundry room. I put all the bathroom cleaners into one container, etc. Makes sense to me!
  • When organizing a child's space, keep the categories general and simple. Your kids will be more likely to maintain the space if they understand how it's arranged.
And there you have it. Sorting is easy and quick. Next week comes the real fun when we get to place our items back in their space! You'll love it I promise!

Click here to see how I "tackled" my girls' hair accessories!

Wednesday, April 20, 2011

Organization Class--Part II

Hello, again! I hope you've given some thought to your organization homework from last week because now we're going to talk about the three steps you must know to organize any space. It comes in a little rhyme to make it easier to remember.

To organize any space think:
Edit
Sort
Place
Easy, huh? So let's talk about editing, otherwise known as purging shall we?

When you have a space to organize, and I'm talking about any space; a cupboard, a drawer, a pantry, a closet, or an entire room. The first thing you have to do is purge the space of any unnecessary things. After all, when it comes time to put things back you don't want to make precious room for something you didn't really want or need in the first place right?

So many people are tempted to go out and buy all the fancy storage solutions that are out there but you must purge first! Often the things you need to place your items are already there, they're just being under-utilized. So how do you go about it?

First you need to pull everything out of the space. Do a little at a time depending on the size of the space. Decide what stays and what goes. Make a pile for things to keep, things to donate, and things to trash.

It seems to me that some people develop an emotional attachment to their things. I find this especially common in my parents' generation. To them I say this: "An item only has value if you benefit from it; otherwise it's clutter. If you haven’t used it in a year, name a specific occasion when you will need it, or get rid of it. And don’t feel bad about tossing old gifts. The love came from the person who gave you the gift, not from the actual sweater or gadget. You received and enjoyed the kind thoughts, so let the object go.”  Quote from Family Circle Magazine

I tell my kids all the time, "If we kept everything that we ever acquired or that someone else gave us, then eventually those things would end up filling up and taking over our whole house."

Being able to have time to spend with my family is more important to me than trying to hold onto things. Holding onto things I don't need clutters my house, keeps me from being able to find things when I really need them, wastes my time, which in turn makes me feel anxious and grumpy, and detracts from the peaceful feeling I strive to keep in my home!

So there you have it, edit your space, let go of the things that don't matter because they are, after all, just things. You cannot take them with you when you die and all that will end up happening is you'll leave your loved ones with the burden of trying to purge for you.

Click here for an example of how I organized my pantry from start to finish.

Friday, April 15, 2011

Organization Class- Part 1


And I'm back! Sorry it's taken me so long to get back to this blog but I do have some good reasons! I've been taking care of some very sick kids for the past two weeks and also I've been preparing a class on organization that I just taught on Tuesday at my church.

Now that the kids are on the mend and my class is all done, I thought I'd take the next few weeks to review what I taught in the class. So here goes!

Part I- A House of Order
First of all I had the class envision the inside of an LDS temple. If you're not LDS click on the link to see what I'm talking about. We then discussed what makes a temple orderly and came up with these answers: Nothing is ever out of place or cluttered. Everyone has a job to do and performs it in a timely and orderly fashion. It is always clean.

I then quoted this scripture from a book called The Doctrine and Covenants which is a book of revelation revealed to the first prophet of our church, Joseph Smith. The scripture says, "Behold, mine house is a house of order, saith the Lord God, and not a house of confusion. D&C 132:8.

"A clean organized room can bring the Spirit of the Lord." This is a quote I found when I was teenager and loved it so much I wrote it down on a little card to be displayed on my bedroom mirror. Back then I was not organized or neat. After years of constantly being punished for not keeping my room clean, my mom finally gave up and let me live in my filth. And I did, quite happily!

As I became a grown-up, however, and became in charge of an entire household, I realized that order and cleanliness make my house run smoother. They make things less stressful. They teach my kids to respect their home, their mother, and themselves. And most importantly, they make my home a peaceful place to be.

So here comes your challenge for the week:
Think of one room in your house or area in your life that is disorganized and ponder these questions:
  1. What don't you like about it?
  2. How does it make you feel?
  3. How does it keep you from accomplishing what you want?
Next time we'll be discussing the first step in organizing any space albeit a drawer, closet or an entire room! Happy pondering. :)

If you're interested in learning more about my faith. Click here!

Tuesday, March 22, 2011

Style Matching


No, this is not a picture of my living room... but I do like the colors!

I occasionally watch The Nate Berkus Show and yesterday was one of the days I caught it as we have a cold going through our house and I wasn't feeling motivated to do much of anything except veg. Anyway, Nate and another designer were talking about how a person's clothing style should be reflective in their interior decorating. Apparently, the two should go hand in hand, and if they don't then you're not really allowing others to see the real you when they enter your home.

I find this concept to be very fascinating and I've been thinking about it ever since. I was telling my husband about this last night at the dinner table and asked him if he thought my clothes and my house matched. He looked me over, shrugged his shoulders, and said, "I don't see it..." Husbands never do though, right? However, the more I've thought about it, the more I realized that yes, my clothes and my house do tend to match.

For example, yesterday I was wearing a teal and green striped sweater and corduroy pants. Although Nathan pointed out that I don't have anything in those colors in my home he was, of course, wrong. My guest bedroom is a French country theme decorated in a dusty teal and brown. My living room and master bedroom are shades of green, and I own a corduroy chair which is my absolute fave plus two corduroy beanbag chairs. See where I'm going with this?

I love birdhouses and welcome signs. You'll find them everywhere in my country-cozy home. I keep my home styled in earth-tones, nothing bright. I myself and a quiet person who prefers to blend in for the most part. I want people to feel comfortable in my home as much as I want them to be comfortable around me. I think my personal style both in my clothes and home say that. I'm a genuinely kind and quiet person, a peace-maker and I've often had people tell me how peaceful my home is.

So, having said all that. Now it's your turn. What do you think your clothes and home say about you? Definitely something to think about. :)

Monday, March 14, 2011

Half the Hamburger, Twice the Health

I learned this tip from my mother-in-law who raised nine children. Mealtime at her house was a hectic time, I'm sure, trying to manage all those little ones. So she started cooking large quantities of hamburger at a time and freezing it in smaller portions for later. That way, when she was ready to prepare a meal, half the work was already done.

I don't cook with hamburger too much because I'm just not a big fan of red meat, but when I do, I most often cook a whole pound and take half of it and freeze it for another recipe. I then double whatever vegetables the recipe calls for so as to not make the liquid be off-balance.

It's easy to do. Simply scoop out the amount you wish to freeze and place it in a quart-sized freezer bag. Press the hamburger flat. This makes the meat much easier to break apart and reheat when you're making another meal. I'm all about saving time when cooking and this is a great way to do just that!

Here's a yummy recipe to get you started!

Szechwan Beef
1 lb ground beef
1 tbsp minced onion
1 tbsp vegetable oil
1 1/2 cups sliced carrots
1 cup frozen peas
1/3 cup water
3 tbsp low sodium soy sauce
2 tbsp cornstarch
1/4 tsp ground ginger
1 can cut baby corn
2 cups instant brown rice

  1. In large skillet, brown ground beef and onion. Remove from skillet and set aside. Place half in a Ziploc bag and freeze for later.
  2. Add oil to skillet and return to medium heat. Add carrots and peas and stir-fry about 3 minutes.
  3. In small cup, combine water and soy sauce with cornstarch and ginger. Add to vegetables in skillet.
  4. Return ground beef to skillet along with baby corn. Cook over medium heat until heated through.
  5. Prepare rice according to package directions. Serve beef and vegetables over rice.

Monday, March 7, 2011

Better Book Organizing for Kids

We love books here at our house! And because we love them so much we have accumulated quite the library. I'm glad that I have passed down my love of reading to my children and I'm glad they love their books so much. However, I wasn't glad with the way the little kid books were always a mess on the shelves. I wasn't glad that my children couldn't find the book they were looking for, and I sure wasn't glad that I was the only one who could put them away.

So, I did something about it!
Instead of lining up all the books vertically, I stacked them horizontally by category, placing the largest books on the bottom and the smallest on top. This way makes my kids be able to see what they're looking for and be able to put them away. I wrote the categories on Post-It notes and laminated them to keep them looking nice. I then attached the labels to the bookshelf with painters tape so the finish would be protected. I put the really large books on top of the shelf in neat piles.

Here's the way I categorized them:
  • Animals
  • Potty books (for little kids)
  • Babies
  • Dogs
  • Feelings and Opposites
  • Getting Dressed and The Body
  • Colors and Shapes
  • ABC's and 123's
  • Touch and Feel
  • Bedtime
  • Nature and Food
  • Church and Jesus
These categories are, of course, just suggestions. Categorize them in the best way for you. And don't worry if your child can't read the labels. With your help, they'll soon be able to memorize where their books go. Before you know it, they'll be reading the labels too.

That is, after all, the whole idea of books. :)

Friday, February 25, 2011

Unwrap your Smile

I have found that it greatly irritates me when I run out of something, especially when I have just been to the store and could've picked up the offending item while I was out.

However, if I unwrap things then I can easily see how much I have left and can make sure I never run out.

Another plus to unwrapping your everyday paper products and diapers is you can fit a lot more of them into a space. This is very handy if you have a small space to work with. If you look at the picture, you can see that I fit an entire box of diapers on one small shelf. I made one giant-sized package of toilet paper fit on another, and worked a whole lot of paper towels onto the bottom. That's an abundance of stuff in one small space!

The last benefit of unwrapping is the way it looks. I think it is more aesthetically pleasing when you store your paper products and other items in their purest form. And since mine are stored on open shelving in my laundry room, it is even more important that everything look nice and clean as guests pass by on their way to the bathroom.

What can you unwrap today?

Friday, February 18, 2011

Creamy Chicken and Rice Soup

 Since the weather seems to be stubbornly staying cold, I thought I'd share my creamy chicken and rice soup recipe that I shared a while back on my other blog. I am a self-proclaimed "convenience chef" and although I am perfectly capable of cooking from scratch, I find it so much easier with my small kids to cook using precooked foods. Someday I'll go back to cooking from scratch but for now, here's a recipe I made up that's healthy, tasty, and super easy.


Creamy Chicken and Rice Soup
Ingredients:
2 cans of 98% fat free cream of chicken soup
2 cans skim milk (use empty chicken soup cans)
1-2 cups of frozen vegetables (the one I use has corn, green beans, peas, & carrots)
1 can of Costco all white canned chicken, broken up into bite-sized pieces.
1 tbsp minced onion
1 tsp parsley
1 tsp basil
1 pkg Uncle Ben's Ready Rice (Long Grain and Wild)
1/4 cup slivered almonds


Directions:
1. Whisk together soup and milk over medium heat.
2. Add vegetables, chicken, onion, and herbs and bring to a boil, stirring frequently.
3. Cook rice in microwave and add along with the almonds to the soup.
4. Stir until heated through and serve! (Serves about 6 but can easily be doubled)


Told you it was easy!

Thursday, February 10, 2011

Get a Handle on Hair ties

I have three little girls and if you are a mother to girls you know how much they love to look pretty! Since my oldest is eight years old, I've had a long time to accumulate many, many hair accessories. Lately, I've found they have taken over the bathroom!
This is not the first time hair ties have taken over. A few years ago I attempted to organize them into little baskets that fit perfectly into the drawers. It worked too except my girls/husband didn't understand my methods of categorizing them and so after awhile they all ended up mixed together until I couldn't find anything anymore. Nothing bugs me more than to not be able to find what I'm looking for!
I knew it was time to tackle the hair ties again so I got to work. First, I dumped out each basket and began sorting them, really sorting them. All the Velcro baby bows in one pile, all the rubber bands in another and so on. The goal was to make the piles as specific as possible so everyone would know where to return them, not just me. I also took this opportunity to toss any worn out ones/broken ones. You know, the ones you say, "Oh, I can glue this flower back onto the barrette sometime." Yet years later there it still is, broken, and taking up space. Yeah, those all went in the trash.

After all the hair ties were sorted, I knew there had to be a better way of containing them. These piles sat in the hallway for a day while I pondered that very topic. Finally, when I had time, I went to my trusty Wal-Mart... okay, okay so it's very trust-worthy. Most of the time they don't have what I'm looking for, but I was hopeful this time they would. :)
And lucky me, they did! In the sporting goods department I picked up three tackle boxes for two bucks each. Score! They are absolutely perfect for storing all the little barrettes and clips I've accumulated throughout the years. They also fit very nicely in the top drawer in the bathroom with room to spare. I recycled some of the little baskets I used before to hold the more abundant categories also.
I used two of the washtubs I mentioned last week for flowers and fluffy hair ties and they're working great also. Now, everyone knows where to put the hair ties and I'm spending a lot less time wandering around the bedrooms and bathroom feverishly trying to keep a handle on them. They're handling themselves these days. :)

Thursday, February 3, 2011

Oh, the Possibilites!

I am always on the lookout for unique storage containers, especially for things that need to be stored in plain sight. While a plastic bin is great when it's hidden behind a door, I think containers with personality add visual interest.

Take these mini washtubs, for example. I found them in the dollar section at Target for a whopping $2.50 each! When I bought them the cashier said, "What would you use these for, Easter baskets?" She's just not looking at them from an organizational perspective. When I saw them I knew I had to have them. First off, they're cute (and inexpensive), second they're wide, and third they're deep. The possibilities are endless! I used two in my laundry room (how fitting!) and two in my kids' bathroom to store hair accessories.

There are so many different ways to store things that can bring a smile to your face. Wicker baskets are a favorite of mine because they are pretty and functional. You will find them all over my house. These washtubs are pretty high up there too. Storage doesn't have to be expensive or boring. See what you can find to de-clutter your life today!

Wednesday, January 26, 2011

Color Coordination

I organize my clothing by color in my closet. Why? Because it makes it so much easier to find what I am looking for. When I can find what I am looking for in a timely fashion I can then start my day faster/get out the door faster. See where I'm going with this?

Having your clothes organized this way also makes putting them away much faster too. No more searching for hangers as I'm hanging up my clean shirts. If I'm putting away a pink shirt, I simply look in the pink section of my closet and there's a hanger!

I organize my girls' (ages 5 and 8) drawers this way too. That way if they ask me, "Mom? Where's my purple shirt with the sequins?" All I have to do is tell them it's with the other purple shirts in their drawer. And it will be there too because that's where they put it when they were putting aways their laundry.

People may wonder why I go to such great lengths to keep my house organized. Here is why: The more efficiently my household runs, the easier it is to keep it picked up, get my chores done, and keep my sanity in the process!

Keeping your clothing organized will save you minutes at a time and those extra minutes add up! If I can save, say 5 minutes, in the morning getting dressed because I can easily find my favorite shirt and another 5 minutes when I have to put away my clothes then I just earned ten minutes in my day to sit on the floor and play with my kids or read a book.

See how many minutes you can save. :)

Wednesday, January 19, 2011

Keep Your Bedroom Blissful

Several years ago, back when my husband and I were still just a couple with no kids, I looked around our then tiny master bedroom and realized there was a problem. I had piles of clothes everywhere! From that moment on I made a concerted effort to put my clothes where they belonged every night before I went to bed, no matter how tired I was. I still do that to this day.

Taking tiny steps like that leads to more happiness. I want my bedroom to be a place of retreat when I go to sleep at night and I want it to be a welcoming haven when I wake up in the morning. I love coming to my bedroom after a stressful day and seeing how clean it is. I can't imagine I would want to spend time in there if there were stacks of books or magazines piled everywhere, kids toys tripping me when I walked, or shoes and clothes strewn about. My days as a stay-at-home mom of four are hectic enough without adding extra stress to them.

Imagine you have a busy ahead of you, you wake up as the sun is streaming in through the windows, and slowly open your eyes. What do you see? Do you see a clean floor, dressers with everything in their place, and clutter-free nightstands? Or do you see shoes and other items of clothing causing a hazard on your walk space, piles of junk everywhere, a treadmill that's become a clothes rack gathering dust in the corner, and dressers with shirts spilling out of them? If your vision was the latter tell me something: You have a busy day ahead right? Well, you've just made your day exponentially more stressful by waking up in the war zone that is supposed to be your bedroom!

De-Clutter expert Peter Walsh (my anti-junk hero) once said this in an interview on the Oprah show, "[Stuff] robs people of so much," he says. "If your house is full of stuff, all the blessings that could fill your house can't get in. The stuff takes over. It robs you psychologically. You can't be at peace."

Strive today to be more at peace. Take the time to make your bedroom be the retreat it was meant to be. Get all that stuff out that was never meant to be in there and take back your sanity, one tiny piece at a time.