Homemaking is whatever you make of it. Every day brings satisfaction along with some work which may be frustrating, routine, and unchallenging. But it is the same in the law office, the dispensary, the laboratory, or the store. There is, however, no more important job than homemaking. As C.S. Lewis said, "A housewife's work... is the one for which all others exist."

James E. Faust


Wednesday, June 5, 2019

Black and White Thinking

I love the look of black furniture. So sleek and goes with everything! Needless to say I have a lot of black furniture. There's just one problem with black. Dust. In the southwest we accumulate a lot of dust and black furniture shows up every speck!
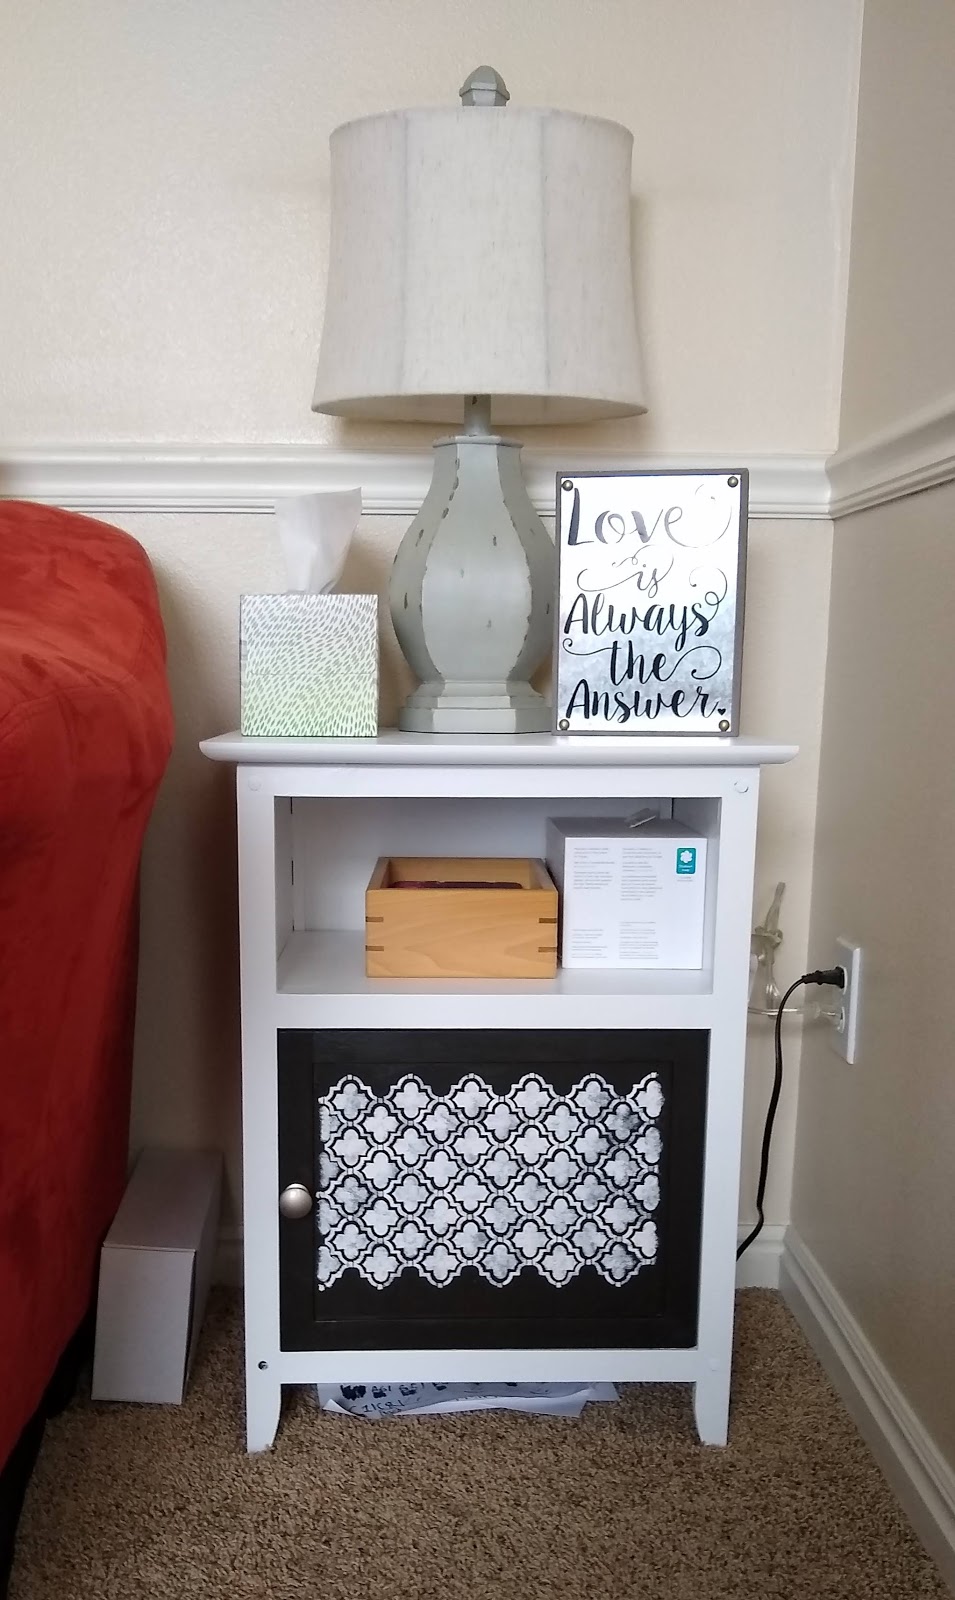
Dusting happens to be one of my least favorite chores because of this. So I decided that my black end tables in the front room had to go. Only one problem. They are relatively new and in perfect condition and I couldn't convince my hubby to let me get new ones. So...

I painted them white! I left the doors a blackish brown but then they looked too modern and didn't really fit in with the rest of my decor. A stencil was the answer. I learned that painting black furniture white takes like a million coats of paint and stenciling is hard. I had to repaint the door once because the stencil was crooked. :( This was not one of my favorite projects BUT I love how they turned out!

So. Much. Better!

I love my "new" end tables.

Monday, February 25, 2019

Playing it by Ear

At our house we have three girls. As you imagine with that many girls we have collected a lot of accessories over the years. 

When my two older girls got their ears pierced I purchased an earring holder to keep their earrings on. Most of the earrings are community property at our house because it's just easier that way. However, even with the earring holder the earrings were getting lost because the girls weren't always willing to put them away on the holder and would leave them on the table in front of the holder instead. Or on the bathroom counter. Or on their nightstands. Or on the dining room table. Kids.

I was getting rather tired of hearing the complaints from the girls when they couldn't find the earrings they were looking for and so I started formulating a plan to make our earring storage simpler. Something that would be faster to find a particular pair and faster to put them away.

Read on to see what I came up with!

First I purchased a long thin sheet of Styrofoam from the craft store. I cut it into squares with an exacto knife.

I put the squares in the bottom of mini plastic drawers.

With the help of my two younger daughters I categorized the the earrings by color and punched them, back and all, into the Styrofoam. This way the earrings won't get all jumbled up and the backs won't get lost.

Finally, I labeled all the drawers and put them back on the table. I am hopeful we will have a lot less lost earrings now. In the meantime the girls are enjoying rediscovering earrings they couldn't see on the holder but can easily find in the drawers.

I'm counting this mini project a success!

Saturday, January 12, 2019

Cookie of the Month

I love being a stay-at-home mom/ homemaker. I love the managerial skills it requires of me and of course the organization. I also love how it pushes me to improve myself. Sometimes, however, it can be a tad bit monotonous and that's where my "projects" come in. I like to make crafts and bake in the time I carve out for myself. 

Last year I challenged myself to make a different kind of cake bread each month.
 
Okay, so I cheated a little and made fudge in November. It still counts, right?

This past year I decided to do cookies! Oh and FYI none of the recipes are my own. I'm great at following other people's creations though. ;)
I tried to make different genres of cookies and cookies I'd never made before. January was snowball cookies which were a big pain to make due to their crumbliness but my daughter Aftyn declared they were her favorite. I guess that makes them worth it! In February I tried red velvet cookies. These became my favorite! SO yummy!

I had a hard time thinking of a St. Patrick's cookie that I thought my kids would all like so I kept it simple and made inside out chocolate chip cookies with mint M&M's. My daughter Breah was particularl fond of them because she loves chocolate/mint combinations. Me too! In April for Easter I made thumbprint cookies that had chocolate fudge centers and a mini Cadbury egg in the center. Pretty good!

May and June cookies both turned out great! May's cookies were a sugar cookie and I chose lemon sugar cookies. They were really, really good! In June I did an oatmeal cookie and added white chocolate, butterscotch, and milk chocolate chips. You can never go wrong with oatmeal cookies!

July was a busy month for us with vacations and such so I kept it simple and made my great-grandma Ambrose's old-fashioned butter cookies. They are a favorite in our house! In August I made cake mix cookies with funfetti cake mix and vanilla frosting. The kids loved them!

September's cookies were chocolate crinkle cookies. The process was interesting for them. They were basically made with refrigerated brownie batter, which was messy. They tasted good though! The kids requested I bring back pumpkin snickerdoodles from Six Sister's Stuff for October. I didn't mind because they are delicious. ;)

In November I chose a candy cookie and made homemade Twix cookies. They were really good but took forever. In the end they yielded 2 dozen cookies which didn't seem like enough for the amount of effort they required. And because December is already crazy I found a simple recipe for vanilla pudding cookies. They weren't my favorite but they were very festive looking and worked very well for Santa's cookies. :)

I'm so proud of myself for sticking with my goal! I got to try so many different cookies that I'd never made before and discovered some new favorites in the process. Goal setting and improving one's self is never a bad thing. Now it's time for the next goal. 

I'm thinking brownies. :)
Saturday, August 11, 2018

That's a Wrap!

For a long time my present wrapping materials were a huge mess. They were spread out everywhere and I never could find what I was looking for. I hate wasted space and so I realized that we could do double duty with a small utility closet that houses our upstairs furnace to create a place for all the wrapping stuff to be in the same place.
I had my husband install a simple wire shelf across the length of the closet and then got to work. I used old wire hangers to hang my gift bags, separating them by boy birthday, girl birthday, Christmas, and general gift bags. This shelf is also where I store the kids' Easter baskets and Halloween bags. 

I bought a cheap dollar store tote and put all the tissue paper I have in it. It works well and can go right next to the gift bags.

For my rolls of wrapping paper I have this handy dandy wrapping paper duffel that I bought from Current Catalog ages ago. They don't sell it anymore but they do have this hanging one that I might like even better!


My gift boxes and bows only get used at Christmas time and so I don't keep them too organized. If I used them all the time I'd probably try harder but they are a low priority for the time being and function fine in their current storage receptacles. ;)

Now my utility closet is functional and keeps the kids and I much more organized when trying to wrap a gift! I guess you could say "that's a wrap!"

What space in your home is being underutilized? 

Tuesday, April 24, 2018

My Laundry Room Makeover

For the first half of our marriage my husband and I lived in Washington where my husband is from. While we were there we moved around a lot, living in four different places, in about 9 years. Because we didn't ever stay put for long and because we always had a baby in the house, we never really got to put our stamp on our homes. 

Then the Lord brought us to Utah where we've lived for the past 9 years, in the same house. We are done growing our family and have no intention of moving for a long time. Because of that we have been using the last four years or so to make this home our own. 

First we started by adding a deck to the back of the house. My husband did it all by himself and he did an awesome job! Then we moved onto a partial kitchen remodel where we rearranged some things to make the space more functional. You can read about that here, here, and here. It was a 3 part series which is why there's 3 links. ;) Next on the agenda was to remove the super lame peninsula fireplace that the previous owners had put in. Then last year we ripped up the hardwood floors that were made of the softest wood of all time and replaced it with beautiful Pergo flooring.

And this year's project was most exciting! It was a laundry room makeover! I know, I know, who cares if a laundry room looks nice or not? Well, in my house the laundry room is the first room one enters from the garage, which also makes it a mudroom for my kids. It is also a pass thru from the kitchen to the main floor bathroom. Laundry rooms by definition aren't supposed to be anything other than a room for laundry but when every guest that comes to my house has to see it, that changes things.

The first problem we addressed was what to do with the dog's crate. I wanted it to stay in the laundry room because it's out of sight but I wanted it to fit better somehow.

After looking on Pinterest I happened upon some "doggie dens" where people had created a space for their dogs using a space that already existed. My daughter Ainsley and I realized that Teddy's bed fit in the space without the crate. We just needed to come up with a door of some sort to keep her in.

Enter my awesome husband who did some researching and found this gate online. He then built it all by himself and made it look "farmhousey" per my request. It easily slides over the space and the dog transitioned to it with no problems. I love it and I love that her kennel is no longer a tripping hazard/ eye sore. :)

So apparently Nathan has a fear that all of our appliances will break at the same time which I guess is a reasonable fear since they are all the same age. He said since we were doing this update we might as well replace our old washer and dryer at the same time. They worked "ish" and were fine but it's been fun to have brand new ones which I have never had in all our years of marriage. They sure are fancy!

After getting the new washer and dryer my husband made a simple shelf to go over the back of them and we installed a simple gray brick backsplash to add visual interest. I love how both of them turned out! Nathan also added an under cabinet light to help me see those illusive stains on the clothes. He's pretty amazing. :)

The biggest transformation came on the mudroom side of the laundry room. I've had these IKEA cubbies for my kids' shoes and coats for years and they are awesome. They are durable and so much bigger than the ones at Wal-Mart or Target. I highly recommend them! I also had two hampers; one for socks and one for towels and stacked my laundry baskets on top. Very functional but not super pretty. Especially when the caboose came along and there wasn't enough room for another set of cubbies so we had to stack them on top! I LOVED my cubbies but as my kids are getting older I decided we were all ready for a more sophisticated approach to our storage. 

So I found an exact picture of what I wanted on Pinterest and hired a carpenter because although Nathan probably could've done it himself, he was nervous about it and didn't have the proper saw. Two days later and we have this glorious site! I thought I loved my cubbies but they pale in comparison to what I have now. SO PRETTY!!! We found the half size canvas bins at Wal-mart for the kids' gloves and hats and the canvas wicker shoe baskets at Target. I had a more "farmhousey" look in mind, like galvanized bins, but I made the mistake of taking Nathan shopping with me so yeah. ;) It's okay. It's still got shiplap which makes me super happy and since Nathan worked so hard on everything AND paid for it all, I suppose I could let him have a say in some of it. ;)

 Eventually I did let my kids hang their jackets and coats on the hooks, though I didn't want them to because then I wouldn't be able to gaze lovingly at the shiplap as easily, but oh well.  I got chalkboard labels for the bins too. I hung one of my most favorite reminders above and I think it turned out great!

 Here's another one of Nathan and my genius creations. I wanted a small drying rack to mount on the wall but I wanted it to also be pretty. I bought this window and pallet at Wal-Mart in their craft section and then Nathan turned them into a custom drying rack for me. Yup. We make a great team. :)

Here's the rest of the wall decor I've got in there. The top left laundry sign came from Hobby Lobby several years ago. Top right is a galvanized flower pot mounted to a wooden plaque. The plaque came from Wal-Mart  and everything else was from Hobby Lobby. The "laundry schedule" sign came from ETSY and I love it. Ain't it the truth?!? The middle left "Laundry" sign is from Amazon. The bottom left "wash, dry, and fold" signs are also from ESTY and the clock is from Hobby Lobby. I bought the washboard from Amazon as well and then distressed it to match the rest of the decor. I really love how it all looks!

My laundry room already had these open shelves. They just needed to be prettied up a bit. I got some more cute bins from Wal-Mart, seriously people, if you are trying to add more farmhouse to your decor, Wal-mart has it going on right now! Where was I? Oh yeah, I got some bins to hide the less aesthetically pleasing items and everything else looks good because it's white. Who knew toilet paper could make such a statement?!? Ha ha ha!

On the shelf I put more "pretty things" and I am not ashamed to say that they all came from Hobby Lobby. I love that store! And the fact that they were willing to lose everything in defense of their religious beliefs makes me an even bigger fan. There is too much "politically correctness" in this world and not enough moral decency. So yes, I love Hobby Lobby and their stuff is just dang cute too!

So now this is the view my guests have as they round the corner on the way to the bathroom. So. Much. Better!

Friday, March 24, 2017

Freeze!

A couple of days ago I did a quick little organization project and I thought I'd share. I organized my freezer... Prepared to be "frozen" with fear at the messy site! Ha ha! ;)
It was a jumbled mess, let me tell ya. :) Normally, I clean out my freezer and fridge a few times a year but with my major foot surgery and recovery this past summer/fall/winter, a lot of things got pushed aside. The freezer was one of many areas that suffered. Each shelf was packed and who knows what was even lurking in the very back? There were some mystery items, for sure. :)

The first step in any organization project is purging. Purging is where you take everything out of your space and go through it all, deciding what stays and what goes. Because I was working with frozen food I had to do this rather quickly. One very full garbage bag later, and I was ready to place all the remaining food back in.

Since I also have a large stand-up freezer in the garage, I decided to use the kitchen freezer for the things we use regularly and the garage freezer to hold the extra stuff that doesn't get eaten as often. To make the shelves able to stay neater I wanted to store the food into two bins, side by side on each shelf. The kids and I made a quick trip to the dollar store to see what we could find.


I was bummed to discover that my freezer shelves weren't wide enough to get two bins on each one. So I had to settle for one bin per shelf but it still works because the bins work as a divider of sorts which makes things easier to see and find. Here's how I categorized my freezer.


At the top is the "Treats" shelf. It's a terrible picture but for now all I have are my beloved boxes of Thin Mint Girl Scout cookies. I have a love/hate relationship with these things. I love to eat them but hate that they tempt me to eat an entire box in one sitting. ;) This summer it will also be the shelf for ice cream too. No one really wants ice cream until it's good and hot outside.


In the middle I have a shelf for frozen breads. My kids love the maple french toast bagels (they sound gross to me). They take them in their lunches and since I always have extras, I freeze them until they're ready to be used. In the bin I put our frozen biscuits from Schwan's. They're really good and we have them with dinner very often. The shelf below has the things the kids and the husband eat for lunch when they are home. We store the box of chicken nuggets on its side so it takes up less space.


The bottom shelf and drawer have our frozen breakfast items and veggies/fruits. My littlest guy refuses to eat cereal for breakfast like the rest of us so we always have a steady supply of Eggo waffles and french toast sticks around because those are the only things he'll eat. I love frozen veggies because they are so convenient to add to recipes. I don't particularly enjoy cooking so anything that speeds up the dinner making process, I'm all for. ;)


The upper door shelf got the meats I use most often in it. I try to feed my family healthy things so we use lots of ground turkey in our dinners, chicken meatballs, and when I do use hamburger, I mostly only use half and freeze the other half for a future dinner.


The middle and bottom shelves got the frozen potatoes and the kids' ice packs for their lunches. After all my cleaning I actually had a little shelf with nothing on it. I'm sure it will get filled up quickly enough. It always does. :) If you noticed I decided to label my shelves. I'm hoping it will help us all keep things more organized in the future. 


I also did a quick cleanup of the garage freezer as well. It was full of things we had intended to eat over the summer while I was on bed rest but my picky kids didn't like half of what we picked out. Grr. In the door are all my cherries. My silly cherry tree decided to produce a bumper crop of cherries over the summer and of course I couldn't do anything with them. So I had my mom freeze them all for me and nine months later, I'm still working on using them up! Anyone want any cherries? ;)


I didn't have enough "happy foot energy" to do too much to it, but at least it's cleaner looking now!

With a little time and a little effort my freezers are functioning so much better! And with the Dollar Store helping, this project cost me a whopping $3 bucks! How's that for a win?!? Woo hoo!

Friday, February 3, 2017

Everything but the Kitchen Sink

Today I looked at the cabinet under my kitchen sink and gasped. How on earth did it end up looking like this?!? I'm supposed to be organized! Then I thought back to the last time I had cleaned out this cupboard and suddenly drew a blank. When was that...? I honestly could not remember, which probably equates to never. At least not since we moved here. Eight years ago. Yikes.
As you can see, once upon a time, I had made somewhat of an effort to contain stuff. I see a couple of bins and a grocery bag container. There's too much stuff in the bins though and there's even more junk hiding behind. This cupboard is in serious need of a makeover! Well, ahem, that happens to be my specialty, you know. So I had at it. I love me a good organization project!

First the little dude and I made a meandering trip to Target. You know, the kind you can only make when four out of the five kids are in school. Yeah. I love those trips. The others? Not so much. ;) Anyway, I digress... Where was I? Ah yes, Target. I love that place! Knowing that I already had two big bins to work with I was on the look out for some stacking shelves called shelf helpers and some smaller bins. Target did not disappoint!


When I came home I got to work. First I pulled everything out of the bins and decided what was a keeper and what was a tosser. I filled a garbage bag with tossers. Eight years became painfully obvious at that point. As you can see the bins were nasty. Years of things being spilled in the bottoms had not been kind to them!


Thankfully, they were good quality bins and all they needed was a good scrubbing. :)

After I cleaned the bins I continued on to empty out the rest of the cabinet. There was a friendly little Easter sticker waiting for me in the back. Hello little Easter egg! How on earth did you get there? It's a mystery. After all the dirty work was done I got to the good stuff. Placing!

An under sink cabinet is tricky I discovered. There's plumbing and a garbage disposal to work around. I had to rearrange things a few times until I found the most accessible and logical way to place things. I used one of my shelf helpers to place the garbage bags. Always try to place like items together. It'll make it easier for everyone to find/ put things away later.

Here's my favorite Christmas present of all time right here. I LOVE my label maker. After all of my items were placed in their appropriate containers, I whipped out this bad boy. Most organization projects aren't truly complete without labels. I can't emphasize this enough! Obviously, you don't want to label everything but an under the sink cabinet (or anywhere not out in the open for that matter) is a perfectly acceptable place for some labels.

I opted to place the labels on the tops of the bin handles. Since the cabinet is under the sink, it will mostly be opened while looking down into it. This will make the labels easily seen.

And here's the finished product! The extra garbage bags are tucked away neatly in the back but still easily reached thanks to my shelf helper. Another shelf helper sits on the other side and contains the extra hand soaps and has my handy rubber gloves (I don't like touching raw meat) underneath. The dish products are now in a little bin of their own instead of being lost/ spilling out every which way. And all the miscellaneous cleaners that I don't use as often are grouped together. 

It looks so much better and I'm confident my husband will be singing my praises tonight when he reaches under the sink to find the dishwasher detergent. That's right. My husband does the dishes at my house. Every night. Jealous? You should be. ;)

And that folks is how I conquered everything but the kitchen sink.